
The Site Setup Form is a templated Excel document that our clients use to communicate details pertaining to new Sites. After the completed form is successfully accepted by FlowWorks' Support team, the enclosed information is used to properly display your Sites via your FlowWorks account.
This topic describes the various parts of the Form, and provides guidance for completing and submitting it.
There is an initial fee for setting up sites (both active and inactive). Only active sites are billed on a monthly basis.
Click the link at the bottom of the page to download the Site Setup Form.
- Please ensure that all internal site names are spelled correctly! Failure to correctly spell your sites and Channels will cause the FlowWorks system to ignore incoming data from these sources. All names are case sensitive.
- If your devices have IP-based communication, the sites must be actively relaying data to FlowWorks before we can create them in FlowWorks. Please refer to the Communication Methods: Considerations documentation for more information.
- If your devices use FTP to communicate data, sites do not need to be actively relaying data prior to creating them in FlowWorks. In this case, you can submit the Site Setup Form prior to relaying data to FlowWorks.
About the Form's four spreadsheet tabs
The Site Setup Form has a total of four spreadsheet tabs, which can be found along the bottom panel.

1. Coversheet
The Coversheet must be completed prior to every submission of the Site Setup Form. This is where you can provide administrative details regarding your project(s). You will see three separate boxes - first, for new and existing customers; second, for existing customers only; third, for trial customers, only. Please complete all boxes that pertain to you, and once finished, proceed to any of the three remaining tabs to specify site details.
2. General Sites
Use the 'General Sites' worksheet to document sites that use any brand of logger, excluding Isco Flowlink and Telog - since these two logger brands must be imported differently, we have included two separate worksheets for inputting this information.
3. Isco Flowlink Only
There's some specific information we require for sites that use Isco Flowlink loggers. For this reason, we've provided a separate worksheet for you to specify sites that use Isco Flowlink. For those sites that use any other logger-brand (excluding Telog), please use the General Sites worksheet.
4. Telog Only
There's some specific information we require for sites that use Telog-brand loggers. For this reason, we've provided a separate worksheet for you to specify sites that use Telog loggers. For those sites that use any other logger-brand (excluding Isco Flowlink), please use the General Sites worksheet.
- Fill-out the Coversheet.
There are three boxes, each pertaining to a certain type of client. Please complete all boxes that apply to you. - Enter site details in the appropriate worksheet(s).
Use the 'General Sites' worksheet to specify Sites that use any logger-type, excluding Isco Flowlink and Telog.
A list of commonly-used terms can be found on the Coversheet.
- Enter the Internal Site Name.
This is the name with which FlowWorks will identify the data - it comes from the configuration of the equipment in the field and must match the Site identifier included in the data packet. If the names do not match, FlowWorks' servers will ignore the Site's incoming data.
- Enter the Display Site Name.
This is the name that will appear in the FlowWorks application.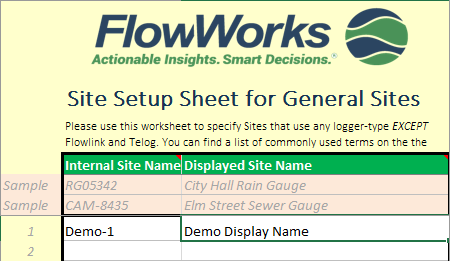
- Specify the Billing Type.
Use the dropdown menu to make your selection. If you are unsure, leave this field blank.
- Specify the Site Status.
It can either be 'Active' or 'Inactive'.
Consider whether you want the site to be active immediately upon setup. Some clients may wish to initially set the site status to 'inactive' for a number of reasons. For example, in some circumstances, clients may still be in the process of establishing infrastructure at a site's location (such as a facility), and they may not be ready to begin operations. In other cases, clients may be setting up a seasonal site and it may not yet be time to make use of it. Others may wish to set the site to 'Inactive' if it is intended to feed-in historical data (not live data).
Although there is an initial site setup fee for each site, inactive sites are not billed monthly; only active sites are billed on a monthly basis.
- Choose the Site Type.
Use the dropdown menu to make your selection.
See below for a list of the available options.
For more information about Site Types, refer to the About Site Type documentation.- Water
- Sewer
- Hydrometric
- Drainage
- Rainfall
- Visual
- Facility
- Precipitation
- Climate
- Overflow / Outfall
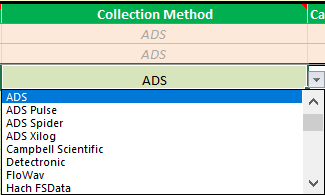
- Choose the Collection Method.
Use the dropdown menu to make your selection.
- If you will be manually importing data to FlowWorks, choose Manual.
- If you are using an FTP file management tool, such as FileZilla, choose FTP.
- If you are a client that has a specific web-service enabled, choose the appropriate option from the list.
- If you are unsure, select Manual.
- Choose the Data Source.
Use the dropdown menu to make your selection.- Choose either None or FTP.
- If you are unsure, choose None.
- Specify the FTP Import file name.
This is the name that is used internally by FlowWorks to organize your data files.
If you are unsure, leave this field blank.
- Enter the Call-in Frequency.
The Call-in Frequency is a numerical expression, representing the number of minutes between data collections. For example, once a day is expressed as "1440" minutes. Entering this in implies that "every 1440 minutes, FlowWorks should expect new data from this particular site." If data is not received within the specified time, the data will be considered 'late' and the site will be labeled yellow on your map.- For sites that have a manual collection method, enter "0" for the call-in frequency.
- Enter the Time Zone that your new site resides in, offset from GMT.
For example, Pacific Time Zone in the united States and Canada is GMT -8; while the time zone of an instrument sending data from Boston is GMT -5.
You can click here to view a time zone map to determine the correct time zone for your site.
Omitting the minus sign where it should be used will cause the data to be incorrectly time-stamped.
- Input the Latitude and Longitude coordinates. Coordinates are expressed in the form of decimal degrees (DD).
- FlowWorks' map uses the WGS 1984 Web Mercator (Auxiliary Sphere) coordinate system. For more information, please refer to the GIS Coordinate System Requirements documentation.
- Click here to view a map of Latitude and Longitude coordinates to help in locating your Site.
- (Optional) specify the site's Street Address.
Although this is optional, you may want to include an address if your use of FlowWorks includes (or will include in the future) Work Orders and other advanced options. This can help provide clearer directions for work and maintenance crew members who need to physically visit your site.
- Select the Default Units, using the dropdown list.
Your two options are US Standard and Metric.
The benefit of setting this is you create a unit standard that will be used automatically. This reduces any additional work that would be required for unit translations.
In some unique cases, you may want to change the units of measure - FlowWorks' Advanced Calculation Engine (FACE) can be used to create virtual, Calculated channels with a particular mathematical formula for converting the channel data to the desired units.
- Choose whether you want to Enable Rainfall Tools for this site. This only applies to rainfall sites.
- Specify the site's Default IDF Curve.
This refers to the IDF curve that you would like FlowWorks to use by default, when conducting Intensity, Duration, Frequency (IDF) Analysis on the site's rainfall data.
- Choose whether you want to Enable I&I Tools for this site.
This refers to using the site for Infiltration and Inflow Analysis.
- (Optional) Specify Units for I&I Tools.
Use the dropdown menu to make your selection.
This refers to the default units of which you want data from this site to be expressed, when using such data in FlowWorks' old Infiltration and Inflow Estimator. This option is not compulsory for using the new I&I Analysis tool.
- Choose whether you want to Enable Photo/Visual Tools for this site.
This option applies to photo and visual sites, only. For all other sites (or if you are unsure), select No.
- (Optional) In the Enable Custom Screen Link column, choose whether you want this site to be used in a custom screen.
This option only applies to clients that already have custom screens in FlowWorks. For more information on custom screens, see article, Custom Display Screens.
- (Optional) In the Enable Apps Link column, choose whether you want this site to link to a custom app in FlowWorks.
This option only applies to clients that already have Custom Apps configured in FlowWorks.
- Enter the Channel Name.
Now, you can proceed to describing the data channels associated with a particular site.The channel's name must match the name that's appended to the transmitted data. If it is not, the data may either be stored in an undesired location, or outright ignored.
- Select the associated units of measurement for the respective channel.
Use the dropdown menu to make your selection.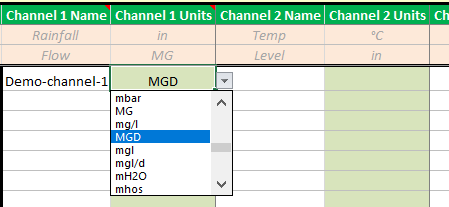
- Repeat the previous two steps for any remaining channels. Use the subsequent columns (Channel 2 name, Channel 2 Units; Channel 3 Name, Channel 3 Units; etc.) to specify additional channels.
If you don't have any channels left to declare, proceed to the next steps.
- Save the Form.
- In Excel, Click File -> Save As.
- In the appropriate text box, append your Client Name or Client ID to the end of the file's name.
- Click Save.
The process of entering information for one site using the 'General Sites' worksheet is now complete. If you have more sites to include in this worksheet, repeat all steps described in this section.
If you have Isco or Telog sites to include in the Site Setup Form, proceed to the next two sections for guidance on completing those worksheets.
Click here to see how you can submit your form to FlowWorks.
Use the 'Isco Flowlink Only' worksheet to specify Sites that use Isco Flowlink telemetry, only.
You can find a list of commonly used term on the Coversheet.
- With the Form open in Excel, click the Isco Flowlink Only tab, found along the bottom of the Excel window.
- Enter the Internal Site Name.
This is the name with which FlowWorks will identify the data - it comes from the configuration of the equipment in the field and must match the Site identifier included in the data packet. If the names do not match, FlowWorks' servers will ignore the Site's incoming data.
- Enter the Display Site Name.
This is the name that will appear in the FlowWorks application.
- Specify the Billing Type.
Use the dropdown menu to make your selection. If you are unsure, please leave this field blank.
- Specify the Site Status. It can either be set to 'Active' or 'Inactive'.
Consider whether you want the site to be active immediately upon setup. Some clients may wish to initially set the site status to 'inactive' for a number of reasons. For example, in some circumstances, clients may still be in the process of establishing infrastructure at a site's location (such as a facility), and they may not be ready to begin operations. In other cases, clients may be setting up a seasonal site and it may not yet be time to make use of it. Others may wish to set the site to 'Inactive' if it is intended to feed-in historical data (not live data).
Although there is an initial site setup fee for all sites (active and inactive), inactive sites are not billed monthly; only active sites are billed on a recurring, monthly basis.
- Choose the Site Type.
Use the dropdown menu to make your selection.
See below for a list of the available options.
For more information about Site Types, refer to the About Site Type documentation.- Water
- Sewer
- Hydrometric
- Drainage
- Rainfall
- Visual
- Facility
- Precipitation
- Climate
- Overflow / Outfall
- Choose the Collection Method. Use the dropdown menu to make your selection.
Since you are specifying Isco only sites, select ISCO.
- Choose the Data Source. Use the dropdown menu to make your selection.
Choose ISCO for the 'Isco Flowlink Only' worksheet.
- Enter the Call-in Frequency.
The Call-in Frequency is a numerical expression, representing the number of minutes between data collections. For example, once a day is expressed as "1440" minutes. Entering this in implies that "every 1440 minutes, FlowWorks should expect new data from this particular site." If data is not received within the specified time, the data will be considered 'late' and the site will be labeled accordingly on your map.
For those sites that have a manual collection method, enter "0" for the Call-in Frequency.
- Enter the Time Zone that your new site resides in, offset from GMT.
For example, Pacific Time Zone in the united States and Canada is GMT -8; while the time zone of an instrument sending data from Boston is GMT -5.
You can click here to view a time zone map to determine the correct time zone for your site.
Omitting the minus sign where it should be used will cause the data to be incorrectly time-stamped.
- Input Latitude and Longitude coordinates. Coordinates are expressed in the form of Decimal Degrees (DD).
- FlowWorks' map uses the WGS 1984 Web Mercator (Auxiliary Sphere) coordinate system. For more information, please refer to the GIS Coordinate System Requirements documentation.
- Click here to view a map of Latitude and Longitude coordinates to help in locating your Site.
- Include the site's Street Address.
Although this is optional, you may want to include an address if your use of FlowWorks includes (or will include in the future) Work Orders and other advanced options. This can help provide clearer directions for work and maintenance crew members who need to physically visit your Site.
- Select the Default Units, using the drop-down list. Your two options are US Standard and Metric.
The benefit of setting this is you create a unit standard that will be used automatically. This reduces any additional work that would be required for unit translations.
In some unique cases, you may want to change the units of measure - FlowWorks' Advanced Calculation Engine (FACE) can be used to create virtual, Calculated channels with a particular mathematical formula for converting the channel data to the desired units.
- Choose whether you want to enable rainfall tools for this site.
This option only applies to rainfall-type sites.
- Specify the site's Default IDF Curve.
This refers to the IDF curve that you would like FlowWorks to use by default when conducting Intensity, Duration, Frequency (IDF) Analysis on this site.
- Choose whether you want to Enable I&I Tools for this site.
This refers to using this site for Infiltration & Inflow Analysis. This should only apply to Sites that you plan to use for such studies.
- (Optional) Specify the Units for I&I Tool. Use the dropdown menu to make your selection.
This refers to the default units of which you want data from this site to be expressed, when using such data in FlowWorks' old Infiltration and Inflow Estimator. This option is not compulsory for using the new I&I Analysis tool.
- Choose whether you want to Enable Photo/Visual Tools for this site.
This option applies to photo and visual sites, only. For all other sites (or if you are unsure), select No.
- (Optional) In the Enable Custom Screen Link column, choose whether you want this site to be used in a custom screen.
This option only applies to clients that already have custom screens in FlowWorks. For more information on custom screens, see article, Custom Display Screens.
- (Optional) In the Enable Apps Link column, choose whether you want this site to link to a custom app in FlowWorks.
This option only applies to clients that already have Custom Apps configured in FlowWorks.
- Enter the Channel Name.
Now, you can proceed to describing the data channels associated with a particular site.The channel's name must match the name that's appended to the transmitted data. If it is not, the data may either be stored in an undesired location, or outright ignored.
- Select the associated units of measurement for the respective channel.
Use the dropdown menu to make your selection.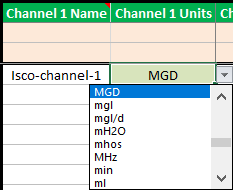
- Repeat the previous two steps for any remaining channels. Use the subsequent columns (Channel 2 name, Channel 2 Units; Channel 3 Name, Channel 3 Units; etc.) to specify additional channels.
If you don't have any channels left to declare, proceed to the next steps.
- Save the Form.
- In Excel, Click File -> Save As.
- In the appropriate text box, append your Client Name or Client ID to the end of the file's name.
- Click Save.
The process of entering information for one site using the 'Isco Flowlink Only' worksheet is now complete. If you have more sites to include in this worksheet, repeat all steps described in this section.
If you have Telog or General sites to include in the Site Setup Form, please see their respective sections for guidance on completing those worksheets.
Use the 'Telog Only' worksheet to specify Sites that use Telog telemetry, only.
It is required that all Telog loggers are transmitting data to FlowWorks prior to site setup. For further information, please refer to the Configure your data loggers section of the Setup Checklist.
You can find a list of commonly used term on the Coversheet.
- With the Form open in Excel, click the Telog Only tab, found along the bottom of the Excel window.
- Enter the Internal Site Name.
This is the name with which FlowWorks will identify the data - it comes from the configuration of the equipment in the field and must match the site identifier included in the data packet. If the names do not match, FlowWorks' servers will ignore the site's incoming data.
- Enter the Display Site Name.
This is the name that will appear in the FlowWorks application.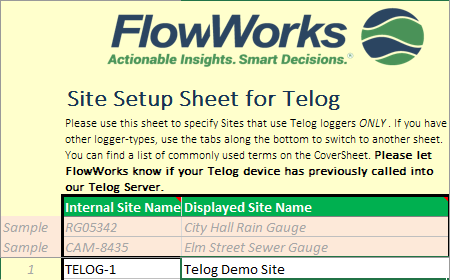
- Specify the Billing Type.
use the dropdown menu to make your selection. If you are unsure, please leave this field blank.
- Specify the Site Status. It can either be set to 'Active' or 'Inactive'.
Consider whether you want the site to be active immediately upon setup. Some clients may wish to initially set the site status to 'inactive' for a number of reasons. For example, in some circumstances, clients may still be in the process of establishing infrastructure at a site's location (such as a facility), and they may not be ready to begin operations. In other cases, clients may be setting up a seasonal site and it may not yet be time to make use of it. Others may wish to set the site to 'Inactive' if it is intended to feed-in historical data (not live data).
Although there is an initial site setup fee for all sites (active and inactive), inactive sites are not billed monthly; only active sites are billed on a recurring, monthly basis.
- Choose the Site Type.
Use the dropdown menu to make your selection.
See below for a list of the available options.
For more information about Site Types, refer to the About Site Type documentation.- Water
- Sewer
- Hydrometric
- Drainage
- Rainfall
- Visual
- Facility
- Precipitation
- Climate
- Overflow / Outfall
- Choose the Collection Method. Use the dropdown menu to make your selection.
There are a number of options for Telog loggers. Choose the option that best describes your collection method.
- If you want to manually import data to FlowWorks, choose Manual.
- If you have FileZilla (or another FTP file management tool) choose FTP.
- If you have a specific web-service enabled,choose the appropriate option from the list.
- If you are unsure, select Manual.
- Choose the Data Source. Use the dropdown menu to make your selection.
Choose Telog for the 'Telog Only' worksheet.
- Enter the Call-in Frequency.
The Call-in Frequency is a numerical expression, representing the number of minutes between data collections. For example, once a day is expressed as "1440" minutes. Entering this in implies that "every 1440 minutes, FlowWorks should expect new data from this particular site." If data is not received within the specified time, the data will be considered 'late' and the site will be labeled accordingly on your map.
For those sites that have a manual collection method, enter "0" for the Call-in Frequency.
- Enter the Time Zone that your new site resides in, offset from GMT.
For example, Pacific Time Zone in the united States and Canada is GMT -8; while the time zone of an instrument sending data from Boston is GMT -5.
You can click here to view a time zone map to determine the correct time zone for your site.
Omitting the minus sign where it should be used will cause the data to be incorrectly time-stamped.
- Input Latitude and Longitude coordinates. Coordinates are expressed in the form of Decimal Degrees (DD).
- FlowWorks' map uses the WGS 1984 Web Mercator (Auxiliary Sphere) coordinate system. For more information, please refer to the GIS Coordinate System Requirements documentation.
- Click here to view a map of Latitude and Longitude coordinates to help in locating your Site.
- Include the site's Street Address.
Although this is optional, you may want to include an address if your use of FlowWorks includes (or will include in the future) Work Orders and other advanced options. This can help provide clearer directions for work and maintenance crew members who need to physically visit your Site.
- Select the Default Units, using the drop-down list. Your two options are US Standard and Metric.
The benefit of setting this is you create a unit standard that will be used automatically. This reduces any additional work that would be required for unit translations.
In some unique cases, you may want to change the units of measure - FlowWorks' Advanced Calculation Engine (FACE) can be used to create virtual, Calculated channels with a particular mathematical formula for converting the channel data to the desired units.
- Choose whether you want to enable rainfall tools for this site.
This option only applies to rainfall-type sites.
- Specify the site's Default IDF Curve.
This refers to the IDF curve that you would like FlowWorks to use by default when conducting Intensity, Duration, Frequency (IDF) Analysis on this site.
- Choose whether you want to Enable I&I Tools for this site.
This refers to using this site for Infiltration & Inflow Analysis. This should only apply to Sites that you plan to use for such studies.
- (Optional) Specify the Units for I&I Tool. Use the dropdown menu to make your selection.
This refers to the default units of which you want data from this site to be expressed, when using such data in FlowWorks' old Infiltration and Inflow Estimator. This option is not compulsory for using the new I&I Analysis tool.
- Choose whether you want to Enable Photo/Visual Tools for this site.
This option applies to photo and visual sites, only. For all other sites (or if you are unsure), select No.
- (Optional) In the Enable Custom Screen Link column, choose whether you want this site to be used in a custom screen.
This option only applies to clients that already have custom screens in FlowWorks. For more information on custom screens, see article, Custom Display Screens.
- (Optional) In the Enable Apps Link column, choose whether you want this site to link to a custom app in FlowWorks.
This option only applies to clients that already have Custom Apps configured in FlowWorks.
- Enter the Channel Name.
Now, you can proceed to describing the data channels associated with a particular site.The channel's name must match the name that's appended to the transmitted data. If it is not, the data may either be stored in an undesired location, or outright ignored.
- Select the associated units of measurement for the respective channel.
Use the dropdown menu to make your selection.
- Repeat the previous two steps for any remaining channels. Use the subsequent columns (Channel 2 name, Channel 2 Units; Channel 3 Name, Channel 3 Units; etc.) to specify additional channels.
If you don't have any channels left to declare, proceed to the next steps.
- Save the Form.
- In Excel, Click File -> Save As.
- In the appropriate text box, append your Client Name or Client ID to the end of the file's name.
- Click Save.
The process of entering information for one site using the 'Telog Only' worksheet is now complete. If you have more sites to include in this worksheet, repeat all steps described in this section.
If you have Isco Flowlink or General sites to include in the Site Setup Form, please see their respective sections for guidance on completing those worksheets.
Once your Site Setup Form is complete, please create a new Support ticket, and insert the completed form as an attachment. Our technical staff will contact you shortly.
0 Comments