
FlowWorks' Advanced Calculation Engine (FACE) is commonly used to create new calculated (virtual) channels. With FACE, users can set up a new calculated channel that consistently copies-in data from the original channel and applies a desired unit conversion formula. The resulting data in the calculated channel can be used for any form of analysis in lieu of the original channel, thus leaving the original channel untouched in case a back-up is ever needed. For example, if the field instrument provides velocity and level but not flow, we can create a calculated channel named Flow, and once configured, it will compile calculated data based on the data values fed in from the raw data channels. Or, you could create a calculated channel for compiling rolling average data, which will report the average of whatever source data that is fed into this calculation over the time period you specify or indefinitely.
Data points do not exist in this calculated channel (hence their virtual nature) but are rather calculated as needed. Yet, with a calculated channel you do not need to recreate the calculation each time you need the data. The channel may be graphed and reported in the same way as any typical raw data channel.

The process for fully establishing a Calculated Channel is twofold
- Start by creating a calculated channel, as described in this topic. Once you have created a new calculated channel, you will need to proceed to step 2.
- Configure a FACE calculation, by either using a formula or function, that is to be applied to data in the calculated channel.
Create a new calculated channel for use with FACE
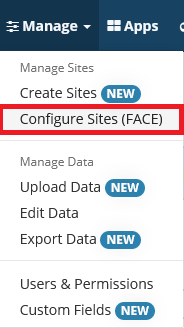
- Click Manage, from the main toolbar.
- Click Configure Sites (FACE).
- Click Add New Channel.
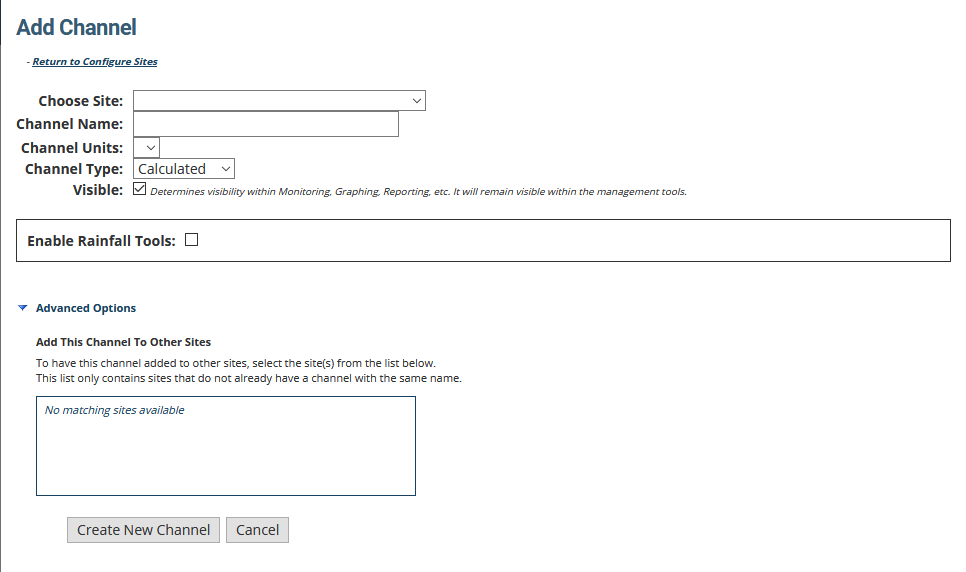

- Set the parameters for your new calculated channel.
-
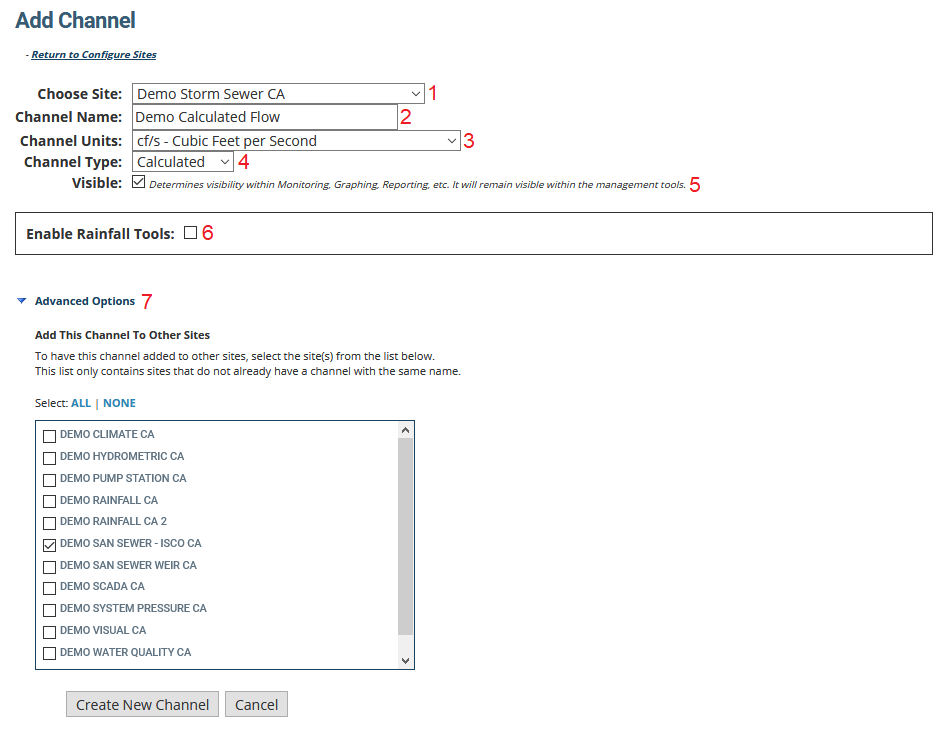
- Use the Choose Site drop-down list to pick a site for the calculated channel to reside in. This is typically the same site that contains the original channel.
-
- Enter a desired Channel Name for the calculated channel. For easy reference, we typically recommend including the name (or part of the name) of the original channel; otherwise enter a name that will allow you to recognize the channel in FlowWorks.
If you are creating this channel to improve on the name of a raw Channel, this is where you will enter a desired new name.
- Enter a desired Channel Name for the calculated channel. For easy reference, we typically recommend including the name (or part of the name) of the original channel; otherwise enter a name that will allow you to recognize the channel in FlowWorks.
-
- Choose the Channel Units.
If you intend to only copy a channel for renaming purposes, ensure the units in this step match exactly with the original channel.
- Choose the Channel Units.
-
- For Channel Type, select the appropriate option. If you are wanting to apply a function or formula calculation to the channel's data, select Calculated.
If you are creating this Channel to simply improve on the name of another channel, select Calculated. This is important because replicating a channel (but with a channel different name) requires configuring a FACE formula that simply copies in the data (but does not apply any mathematical manipulations to it).
- For Channel Type, select the appropriate option. If you are wanting to apply a function or formula calculation to the channel's data, select Calculated.
-
- Ensure Visible is checked, to enable use of the calculated channel in management tools (such as Graphing and Reporting); check System Admin Only if you want to restrict visibility of the calculated channel to just system administrators.
-
- Select Enable Rainfall Tools if your new channel is to collect rainfall-related data. Doing so will enable the channel's use in many of FlowWorks' rainfall analysis tools, such as I&I Analysis and Rainfall IDF Analysis.
-
- (Optional) You can add the same calculated channel to several sites at the same time. To do so, expand Advanced Options and select the desired sites from the list.
The site list in Advanced Options contains only those sites that do not already have a channel with the same name.
- (Optional) You can add the same calculated channel to several sites at the same time. To do so, expand Advanced Options and select the desired sites from the list.
- Click Create New Channel.
The system may need a few moments to process. You will be taken back to the Configure Sites page once complete.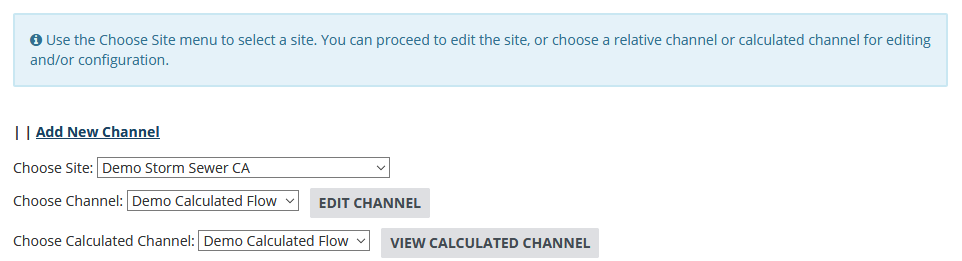
At this point, your new calculated channel is now established.

Next Steps
Now that you have created a new calculated channel, you must now proceed to configuring this channel's FACE calculation. This requirement also applies to those who simply want to copy data over to a different channel.
The next step starts at the Configure Sites page, where you are taken after creating a new calculated channel.
To find out how to create a new calculation, please choose from the following topics. The first topic in this list is a general how-to of setting up a calculation; the remainder of the topics are practical use-cases that include guidance for replicating the scenario yourself.
- Configure a Calculated Channel With a Function (General Steps)
- Configure a Calculated Channel With a Formula (General Steps)
- Formula Example: Make a Copy of a Channel
- Formula Example: Create a Phantom Site with Data From More Than One Site
- Formula Example: Convert Measurement Units of a Channel
- Function Example: Use Interpolate to Change the Time Interval of a Channel
0 Comments